—article by Emilie Menzel
Sharing as an artist on Facebook, Instagram, and Twitter can be a fantastic way to expand your audience and get the word out about your projects. Still, thinking about managing a professional artistic social media presence can be overwhelming. Here’s a quick guide on how to start:
1. Identify your goal
You don’t need to jump into the world of social media art marketing just because it seems like this is what you’re “supposed” to do or this is what “everybody” else is doing. Social media takes time, and there’s a lot of other ways you could be spending that time. So before you decide this is something you want to do, it’s important to think about why.
Before diving in, think about what specifically you would like to achieve through a more robust and intentional social media presence. Some goal ideas:
- Increase sales of your artwork
- Drive traffic to your website
- Let people know your business hours
- Gather subscribers to your newsletter
- Give people a centralized location at which to find updates about your artistic work
- Expand your audience to people you don’t know personally
- Act on a belief that art should be shared and available to everybody
- Provide insight into your creation process
- Find community with shared interests
Once you identify a goal, always keep this in mind when sharing any social media content. This isn’t to say push that goal with everything you do, but keep it in the back of your head as you decide on what sorts of content to share.
2. Consider whose content you enjoy
There isn’t a right way to do social media. You get to decide what that looks like. So spend a little time thinking about what you’d like that to be!
As part of your social media project, do a little research:
- Think about who you follow online. Why do you follow them? What do you like about the content they share? What types of content do they usually share (e.g. news, process photos, events)? Make a list of the reasons you follow these accounts.
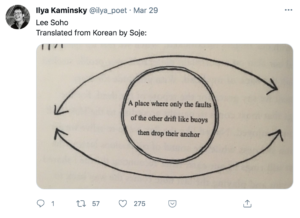
- Take a week to bookmark social media posts you think are particularly well done. Maybe the graphic seems really beautiful. Maybe the post text is zingy and catches your attention. What stood out to you? How might you replicate that in your own social media presence?
- Take a week to bookmark social media posts you really do not like. Think about what particularly threw you about these posts. What do you want to make sure you don’t do with your own social media presence?
3. Choose a social media platform
 Twitter, Instagram, Facebook, SnapChat, Tik Tok: there’s a lot of different social media platforms, and it would take a full time job to create robust social media presences on all of these. Something you’ll want to think about, then, is what platform(s) to use. Here’s some things to consider before making that decision:
- Where do you already have accounts? Do you already use Facebook regularly but have never touched Instagram? Start / stick with the platform already integrated into your routine.
- What type of content do you tend to share and/or anticipate sharing? Each platform has its own set of advantages and disadvantages. Instagram is great for pictures but doesn’t allow you to include clickable links in posts. Twitter is great for engaging in public conversations with other users, but then those conversations are public. Facebook is great for sharing events and articles.
4. Keep it professional
When creating an artistic social presence, it can be helpful to create some separation between your personal social media presence (e.g. pictures of your pets, your family and friends, meals) and your professional artist social media presence. This helps keep your professional profile’s content consistent, which is important for gathering an audience. Consider creating separate social media accounts from your artistic social media presence rather than expanding your personal social media accounts to include professional material.
- For Facebook, this is especially important. You’ll want to create a business page, not another regular Facebook profile.
- When creating professional social media accounts, use the same social media username (ie “handle”) across all platforms. This makes it a lot easier for people to find you across platforms and a lot easier for you to share this information. For example, the Orange County Arts Commission is @OCNCArts on Facebook, Instagram, and Twitter.
5. Take advantage of what you’re already doing
 So you’re going to do this social media thing. You’ve determined your goal and picked a platform. How do you come up with material to share? Probably the biggest gift you can give to yourself (and your time) is to find a way to share on social media what you’re already doing.
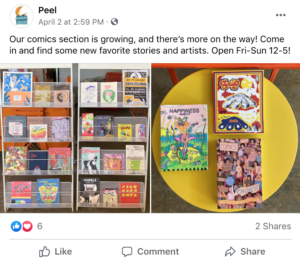
For example, I’m a writer who draws heavy inspiration from illustrations and other visual art. On my social accounts, I thus often share pictures of the art books I’m looking at for my daily writing prompt. Are you a heavy reader? Is your reading ever relevant to your artistic work? Share quotes from your reading. Are you always sending your friends artistic articles or upcoming arts events? Share those on your professional artist profiles as well. Share pictures of your creative process or desk spaces (that you feel comfortable sharing).
6. Quality over quantity
It is infinitely better to post less often with high quality material than it is to post constantly with low quality material. Don’t feel like you need to post something just for the sake of saying something. Feeling like you need to post alllll the time can quickly lead to social media burnout. So what does high quality mean?
- Make sure your images are high resolution
- On Instagram and Facebook, it’s a good rule of thumb to not post more than once a day
- Keep your captions short and sweet (Twitter’s character limit is a good guide across all platforms)
- Don’t feel like you need to post every day. Remember that the most important work is your artwork, and if you find social media getting in the way of that, take a breather from social.
7. Hashtag what now
 Perhaps one of the biggest buzz words that gets thrown around when people think social media is “hashtags.” Hashtags are, well, tags people can add to posts to make those posts show up when somebody searches by that tag. It’s a way of grouping posts by topic. The tool emerged on Twitter as a way of organizing conversations. For example, if a group of people were talking about gardening in the south, people could follow the (imaginary) hashtag #GardeningInTheSouth to find people who were part of the conversation, and then could “tag” their posts with #GardeningInTheSouth in order to contribute to the conversation. Some words of advice on hashtags:
- Do not let fear of hashtags keep you from using social media. In sincerity, it’s better to use no hashtags than to get sucked into using too many.
- Too many hashtags make posts feel like spam, and that drives readers away.
- Hashtags are used differently on different platforms:
- On Facebook and Twitter: Use 1-2. Used for specific conversations.
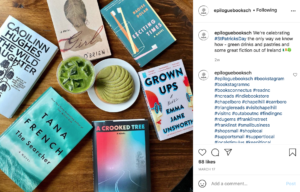
- On Instagram: Use up to ~10, but add them as a comment on your post so they don’t crowd the post’s caption. Used more as general subject tags than specific conversation tags.
- Here’s some more information on how to use hashtags on Instagram
- Capitalize the first letter of each “word” in a hashtag to make the hashtag screen readable. For example, instead of writing #chapelhillnc, write #ChapelHillNC.
8. Some useful apps
Last but not least, here are a few tools that might help you in your social media project:
- Canva: Your social media best friend. Great for creating quick and easy social media graphics.
- Linktree: For those without a website, creating a linktree can be a good way to put several you-relevant links into one place. For example, you might include a link to each of your social accounts, a link to an article you recently wrote, and a link to a project you recently helped put together.
- Lnk.Bio: Instagram does not allow you to put clickable links into post descriptions, but you can include a link on your Instagram profile (where your website goes). That’s why you’re always seeing posts that say “link in bio.” This app lets you include multiple “links in your bio,” so you’re not always having to switch out the url every time you post something new.
- Repost: This app allows you to reshare other people’s posts on Instagram. Just be sure to give credit to the original poster!